Set up appointment scheduling
Turn scheduling on, name the appointments you offer, set your booking rules, and invite applicants to pick a time.
Scheduling lets your students pick a time with your program instead of waiting for someone to reach out. You decide what can be booked, how long it takes, and how much notice you need. Your advisors decide when they are free. This article covers the admin half.
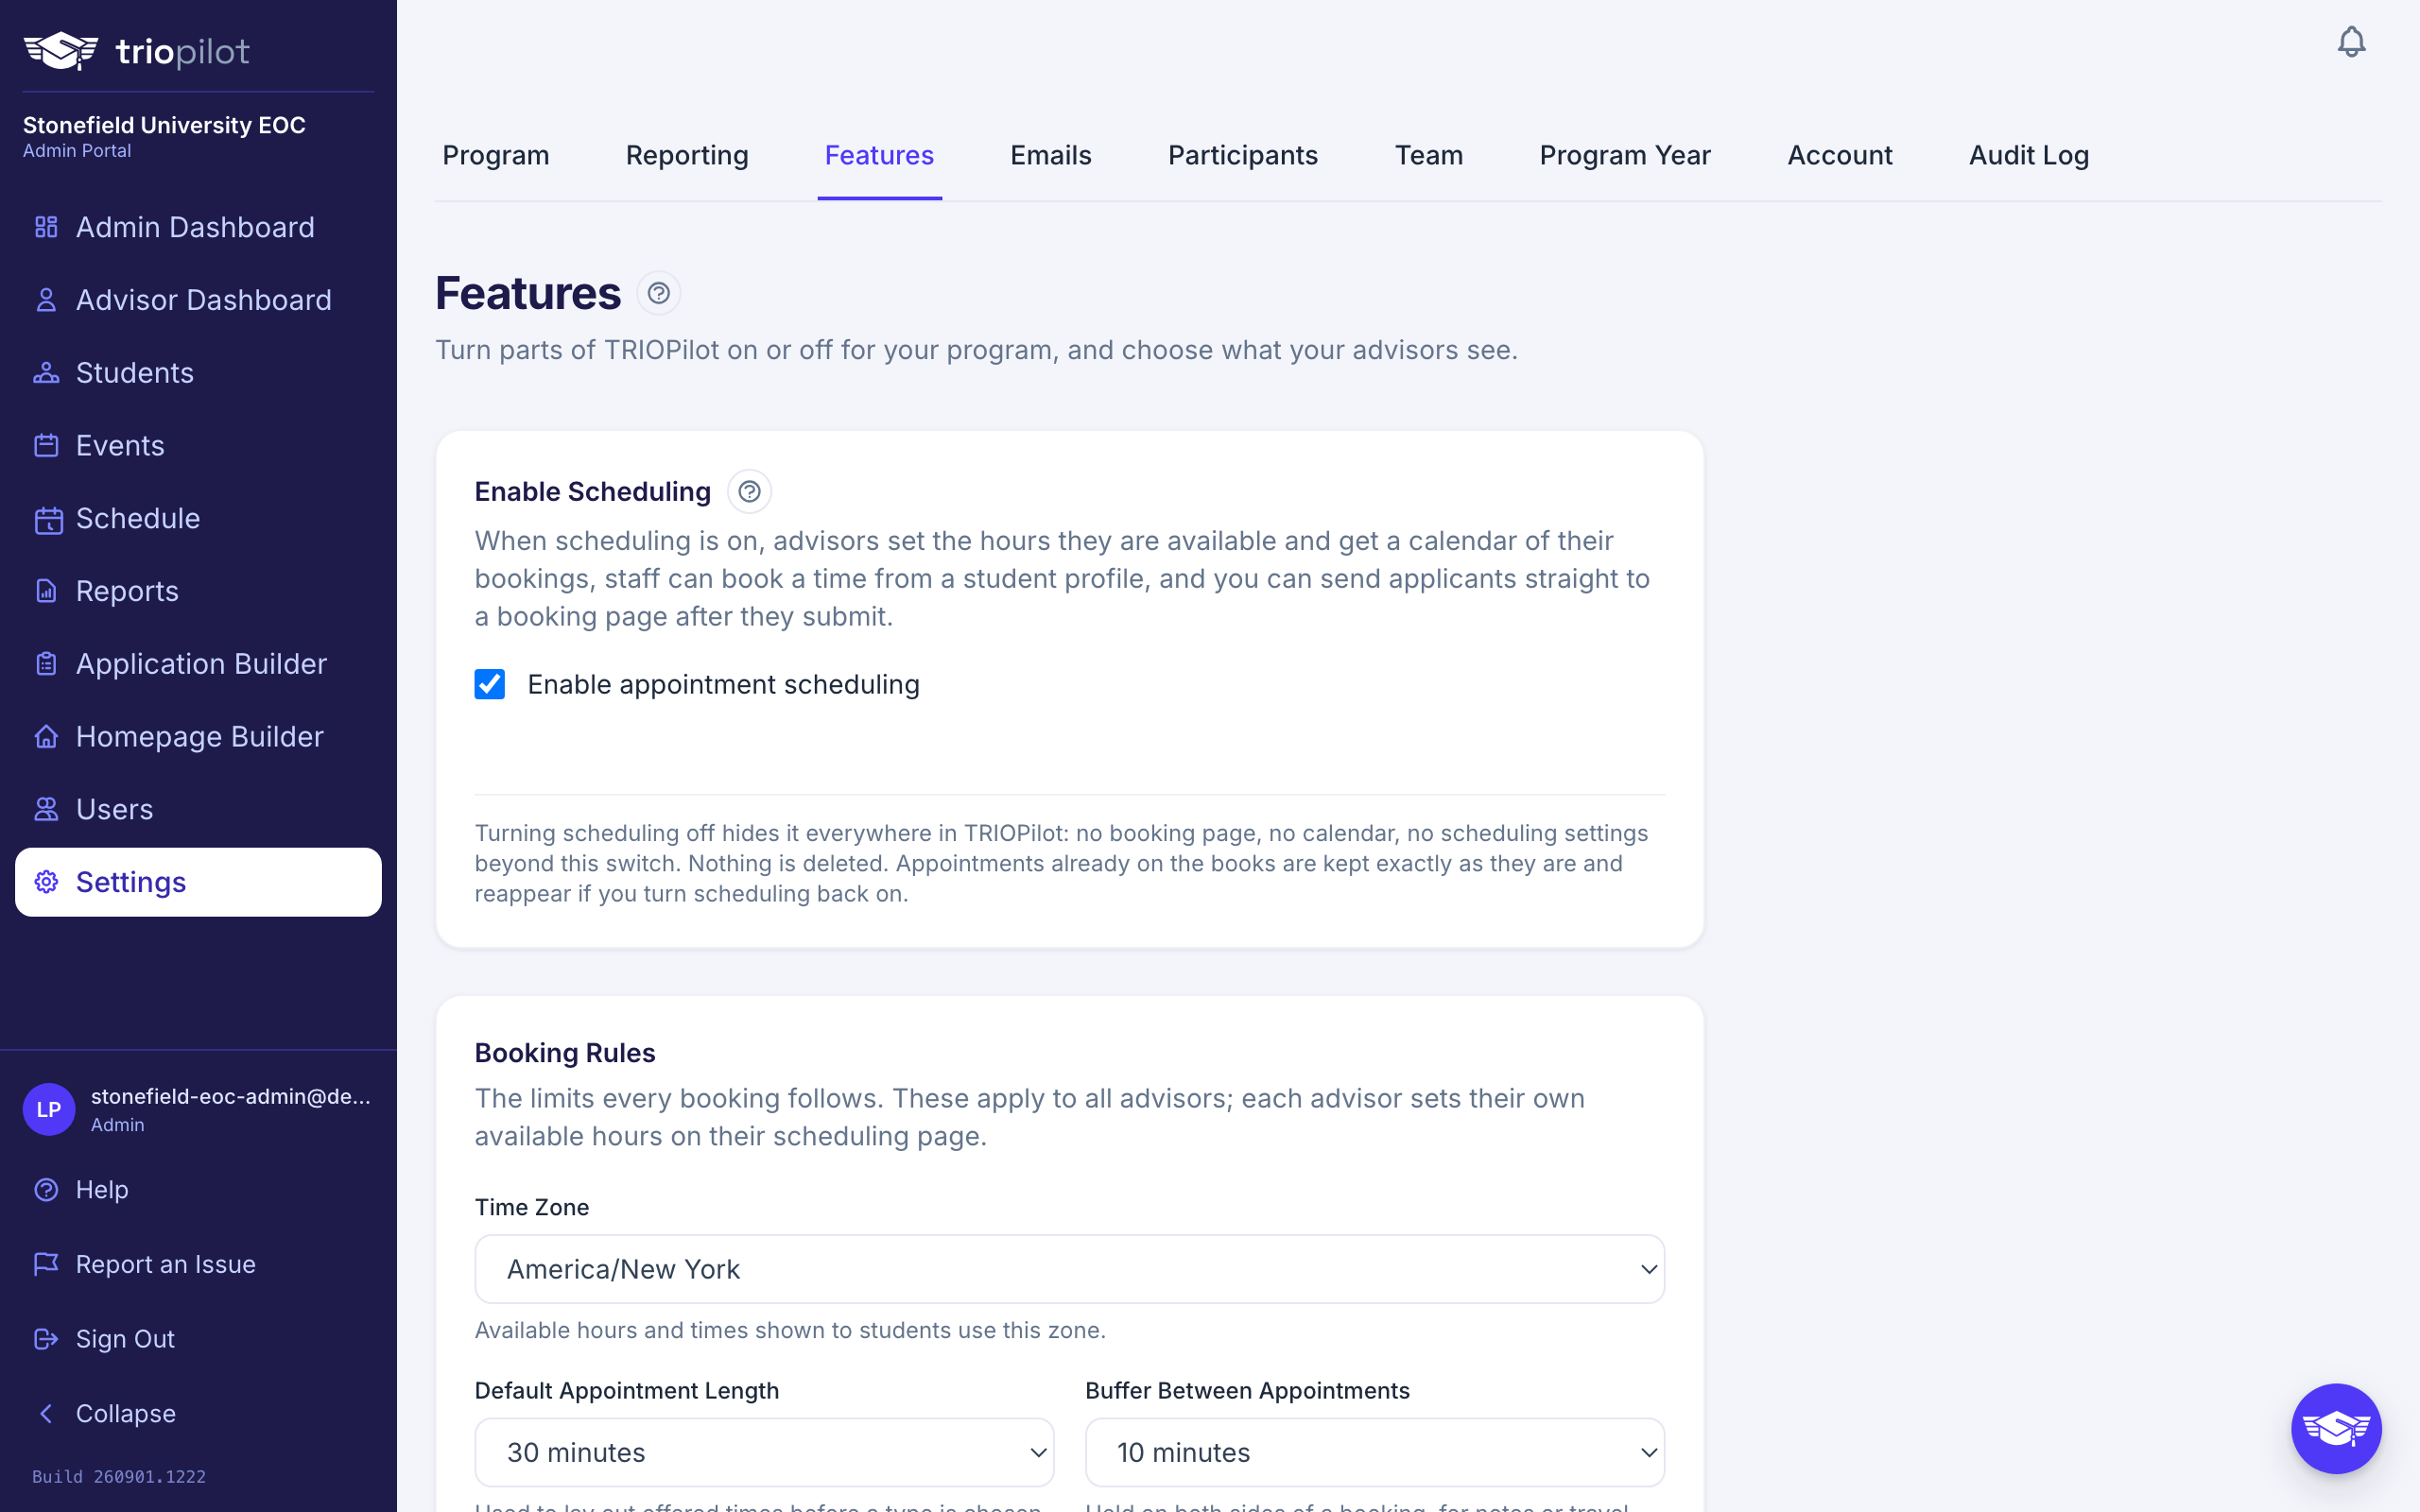
Setting it up is four steps: turn it on, name your appointment types, choose which formats can be booked, and set your booking rules. After that, at least one advisor has to post their hours before anything is bookable.
Turn Scheduling On
Open Settings, choose the Features tab, and tick Enable appointment scheduling on the Enable Scheduling card. It saves the moment you tick it, and two more cards appear underneath: Booking Rules and Appointment Types.
One further thing changes on that same tab, further down. The Activity Feed Display card gains an Appointments row, which decides whether booked, rescheduled, and cancelled appointments show up in the activity feed on a student's profile. It arrives switched on, so you only need to visit it if you would rather keep those entries out of the feed. Turn scheduling back off and the row disappears again, along with the entries themselves.
A Schedule entry also appears in your sidebar.
With scheduling off, the feature is out of sight: no Schedule entry, no appointments on profiles or dashboards, and no scheduling settings beyond the switch itself. The booking address still answers, on purpose. A visitor who follows an old link sees a short page headed Online Booking Is Not Available telling them your program is not booking appointments online right now and asking them to contact your office. Nobody lands on a broken page, and you are never left tidying up leftover pieces.
Turning it off deletes nothing. Appointments already on the books are kept exactly as they are and reappear the moment you turn scheduling back on, so a program can switch it off for a term without losing history. If your application form was set to invite applicants to book, they simply see your confirmation screen while it is off.
Name Your Appointment Types
An appointment type is what a student is booking: an enrollment consultation, financial aid support, whatever your program calls it. Nothing is set up for you, for any program type. Your list starts empty and the words are yours. The faint example text in the form is a placeholder, not a saved entry.
Add your first type on the Appointment Types card:
- Give it a Name, up to 80 characters. This is what students and staff see.
- Add a Description if it helps. It is optional, up to 400 characters, and it appears under the name when a student is choosing between types. It is a good place for "bring any award letters you already have". Worth knowing: if your program has only one type, there is nothing to choose between, so students skip that step and never see the description. Write it anyway for the day you add a second type.
- Choose a Length from the list, which runs from 15 minutes up to 2 hours.
- Choose the Modalities this type can happen in, or leave it empty to allow any format your program offers for booking.
- Choose Add Type.
The small arrows beside each type move it up or down, and that order is the order students see.
Until you have at least one active type, no student can book. Staff are not stuck in the meantime: booking from a student's profile, they can choose Other and name the appointment themselves, which is how a walk-in gets recorded before your list is finished. If your booking page says it cannot take bookings, an empty type list is the first thing to check.
Turning A Type Off
Types cannot be deleted, on purpose. Clear the Active box instead and confirm. Students can no longer book that type and staff no longer see it when booking on someone's behalf, but every appointment already booked keeps the name it recorded, so your history still reads correctly. You can turn a type back on at any time.
Choose Which Formats Can Be Booked
Bookable Modalities, on the Booking Rules card, decides how an appointment can happen: in person, online, by phone, or whatever your program calls those.
These are not our words. They are your program's own modalities, the same list your advisors choose from when they log a contact, which you manage under Settings, on the Participants tab. That is deliberate: the words a student books with are the words the advisor logs the meeting with, so nobody has to translate between two vocabularies.
- Leave it empty and every modality your program has defined can be booked. Most programs can stop here.
- Pick some and only those are offered to students. Useful when a modality makes sense for logging but not for booking, for example a field visit your staff arrange themselves. Staff booking on someone's behalf can still choose any modality your program has defined, so this narrows what a student is offered rather than what your office can record.
An individual appointment type can narrow this further with its own Modalities. A type with none of its own accepts anything on the bookable list.
If your program has no modalities at all, the card says so and points you to the list. Add at least one before going further. Without a modality there is nothing a booking can be, and the booking page will refuse.
Set Your Booking Rules
These rules shape what a student is offered on your booking page. Each advisor still sets their own hours.
- Time Zone is the zone your posted hours mean and the zone times are shown in. Set this first, because everything else is read through it.
- Default Appointment Length is the length the calendar is laid out in before a student has chosen a type, and the length staff get when they name an appointment on the spot. Every appointment type carries a length of its own, so this is not a fallback for a type that lacks one.
- Buffer Between Appointments is padding held on both sides of every booked appointment, for notes or travel. With a 15 minute buffer, a 2:00 to 2:30 appointment also keeps 1:45 to 2:00 and 2:30 to 2:45 out of the offered times.
- Minimum Notice is how soon a time may be booked, from no minimum up to a week ahead. It is what stops someone booking your 9:00 at 8:55.
- Booking Window is how far into the future students may book, from one week to six months. The booking page offers about a month at a time, so a longer window does not put more dates on one screen. It matters as the weeks roll forward, and for staff, who can book any date at all.
Choose Save Booking Rules when you are done.
A program that has never opened this card runs on Eastern time, 30 minute appointments, no buffer, one day of notice, and a one month booking window.
Staff booking on someone's behalf can step outside these rules. The booking form staff use carries an outside hours option, and choosing it skips your minimum notice, your buffer, your booking window, and the advisor's posted hours all at once. That is what makes a walk-in or a phone call workable. Four things it never skips: it will not double book an advisor, it will not book over time an advisor has blocked off, it will not book over a meeting on an advisor's connected Outlook calendar, and it will not book on a day the whole program is closed. See Change or cancel an appointment.
How Times Are Worked Out
Within each block of hours an advisor posts, times are offered one after another from the start of the block, and a time is only offered if the whole appointment fits inside the block. With a 30 minute length and hours of 9:00 to 12:00, a student sees 9:00, 9:30, and so on through 11:30. Times then drop back out where an appointment is already booked, inside the buffer around it, and anywhere the advisor has blocked off. Your minimum notice and booking window trim the two ends of the list.
Ask Your Advisors To Post Their Hours
Nothing is bookable until an advisor does two things on their own Schedule page: switch on Available For Booking and enter their Weekly Hours. The two fail in different ways, and knowing which message you are looking at tells you which half is missing:
- Nobody in your program is set to take bookings, because no one has switched Available For Booking on, or the only person who did has since been archived. The booking page tells students your program is not booking appointments online right now and asks them to contact your office. That wording is deliberate. It is a configuration state you can fix, so it does not invite anyone to check back later.
- Someone is switched on but has posted no hours, or every time is taken. The booking page says there are no open times available at the moment and suggests checking back soon. This is the easier one to end up in, because ticking the switch is the quick half and filling in a week is the slow half.
Advisors can also list the Formats I Offer to take only some of your bookable modalities. Left empty, they take any of them.
Only advisors and admins can be booked, because those are the roles that carry a caseload. Assistants and read-only seats are never offered, and someone who has been archived stops receiving appointments even if their hours are still on file.
When more than one person is free at the same time, the appointment goes to whoever has the fewest appointments in that stretch. A student who already has an assigned advisor gets that advisor whenever that advisor is free. When a student books online and has no advisor yet, the advisor who takes the appointment becomes their assigned advisor. A staff member booking on a student's behalf does not change anyone's assignment, so an unassigned student stays unassigned until someone assigns them.
Time Away From The Desk
Weekly hours say when an advisor is generally free. Time Off, on the same Schedule page, is how they take specific dates back out again: an external meeting, a day at a conference, a week away. A block removes those times from what students are offered, exactly as a booked appointment does, with one difference worth knowing. No buffer is held around a block. A block from 2:00 to 3:00 takes out 2:00 to 3:00 and nothing more, even when your buffer is 15 minutes.
A break that happens every week is not time off. A daily lunch belongs in the weekly hours as a gap between two windows, such as 9:00 to 12:00 and then 1:00 to 5:00. Time off is for one specific date or stretch of dates.
Advisors manage their own blocks and you cannot enter one for somebody else. You can see them all, though. In the all advisor view described below, every advisor's blocked time is drawn as a hatched band carrying their name, and the short note they typed on it is visible to you there. Students never see either. See Manage your schedule for the advisor's side of this.
Days Off For The Whole Program
Time off belongs to one advisor. When the whole program is closed, a holiday or an institutional closure, use the Days Off card instead. It sits on the same Features tab, below the scheduling cards, and only admins can change it.
The card arrives already filled in with the US federal holidays, for this year and every year after: New Year's Day, Martin Luther King Jr. Day, Presidents Day, Memorial Day, Juneteenth, Independence Day, Labor Day, Columbus Day, Veterans Day, Thanksgiving, and Christmas. The dates are worked out, not stored, so next year's list appears on its own and there is nothing to refresh. When a fixed-date holiday lands on a weekend, the card lists both the day itself and the weekday it is observed on, each with its own switch, because closing the observed Friday while keeping Saturday hours is a real choice some programs make.
Untick any holiday your program stays open for, and it goes back to being an ordinary day. To close a day the list does not know about, a staff development day or a weather closure, pick the date at the bottom, type a short reason, and add it. The reason is shown to staff on the Schedule calendar; students never see it.
On a closed day, nobody can book: the public booking page offers no times, and staff booking is refused too, including the outside hours option. What a closure never does is touch appointments already on the books. If any exist on a day you close, the card tells you how many right after you save, and they stay exactly where they are until someone reschedules or cancels them deliberately, because a student who booked before the closure has no way of knowing about it. Find them on the Schedule calendar, where a closed day is tinted and labelled.
Invite Applicants To Book After They Apply
Open the Application Builder, find After Submission, and choose Invite them to book an appointment. Save the form.
Applicants then stay on your confirmation screen and see an invitation to pick a time just underneath your confirmation message, with a button that opens the booking page. See Build your application form for the other two options.
The option stays visible when scheduling is off so you can see the capability exists, but it cannot be chosen until you turn scheduling on.
Choosing it matters more than it looks, because that invitation is what lets an applicant book at all. While scheduling is on, anyone with the link can open the booking page and see your open times, but only someone who has just submitted your form through this route can finish a booking. Everyone else is told to contact your office instead. Leave this option unchosen and visitors to the booking page can look but never book.
Two practical consequences worth knowing when someone reports a problem:
- The invitation works in the same browser tab the applicant submitted from. Opening the booking page later, in a new tab or on another device, will not carry it over.
- It stops working about two hours after they submit. Someone who comes back the next day should call your office, and staff can book for them from the student's profile.
Outlook And Teams
Advisors can link their own college Microsoft 365 calendar. Once one does, their Outlook meetings count as busy time when students are offered slots, and every appointment booked with them lands on their Outlook calendar with the student invited. You do not connect anyone: each advisor does it from their own Schedule page, and only they can undo it. See Connect your Outlook calendar for the advisor's side.
Two things on your side are worth setting.
Teams Meeting Links, on the Booking Rules card, decides which of your formats get a Teams link. Pick the online ones, and appointments booked in those formats are created as Teams meetings on the advisor's Outlook calendar. Leave it empty and no Teams links are added at all. Two conditions apply whatever you pick: it only happens for advisors who have connected Outlook, and only where their calendar offers Teams. A calendar without it gets an ordinary event rather than an error.
The Outlook Calendar card, further down the same Features tab, is where you see how it is going. It lists your advisors and admins with Connected, Not connected, or Needs reconnecting beside each name, so a program that thinks it turned this on can check. The card appears only while scheduling is switched on.
If that card says the integration is not enabled on this TRIOPilot installation, there is nothing for you to set up.
The Link For Your IT Department
Some colleges do not let staff approve apps for themselves. An advisor at one of those colleges gets a message from Microsoft saying an administrator must approve the app, and cannot get past it alone.
The same card carries the link to fix that. Copy it and send it to your IT department. It opens Microsoft's own approval page for the TRIOPilot app, for your college as a whole. It does not connect anybody's calendar: it only clears the way, so advisors can then connect their own.
What IT usually wants to know is on the card too, so you can pass it on without asking us:
- TRIOPilot asks for delegated permission only. It acts as the advisor who signed in, never as the college, and it can reach that person's own calendar and nothing else. No other mailboxes, no mail, no files.
- The three permissions are printed on the card under their Microsoft names,
offline_access,User.ReadandCalendars.ReadWrite, which mean staying signed in so the connection keeps working, reading the person's name and email address, and reading and writing their own calendars. - The exact sign-in return address is printed on the card as well, which is the detail IT is most likely to ask for.
See The Whole Program's Week
Open Schedule from your sidebar. As an admin you get two links at the top: My schedule and All advisors.
Your own week opens first, on purpose, because this page is also where you set your own hours. All advisors widens it to every advisor's booked appointments for that week, each one named, so you can see the program's week at a glance. Blocked time widens with it, so you can also see who is away.
One deliberate difference in that view: the green shading that shows available hours is hidden. Available hours belong to one person, so shading everyone's week with yours would say something false about your colleagues, and merging several people's hours would suggest any of them is free at a time when only one is. Blocked time is different, because each block is a plain fact about one named person and stays true however many advisors are on screen. So the whole program view shows what is booked and who is away, not what is open.