Build your application form
Use the Application Builder to design the intake form applicants fill out.
The Application Builder is where you design the form new students fill out to apply to your program. You control the questions, their order, and which ones are required. No developer needed.
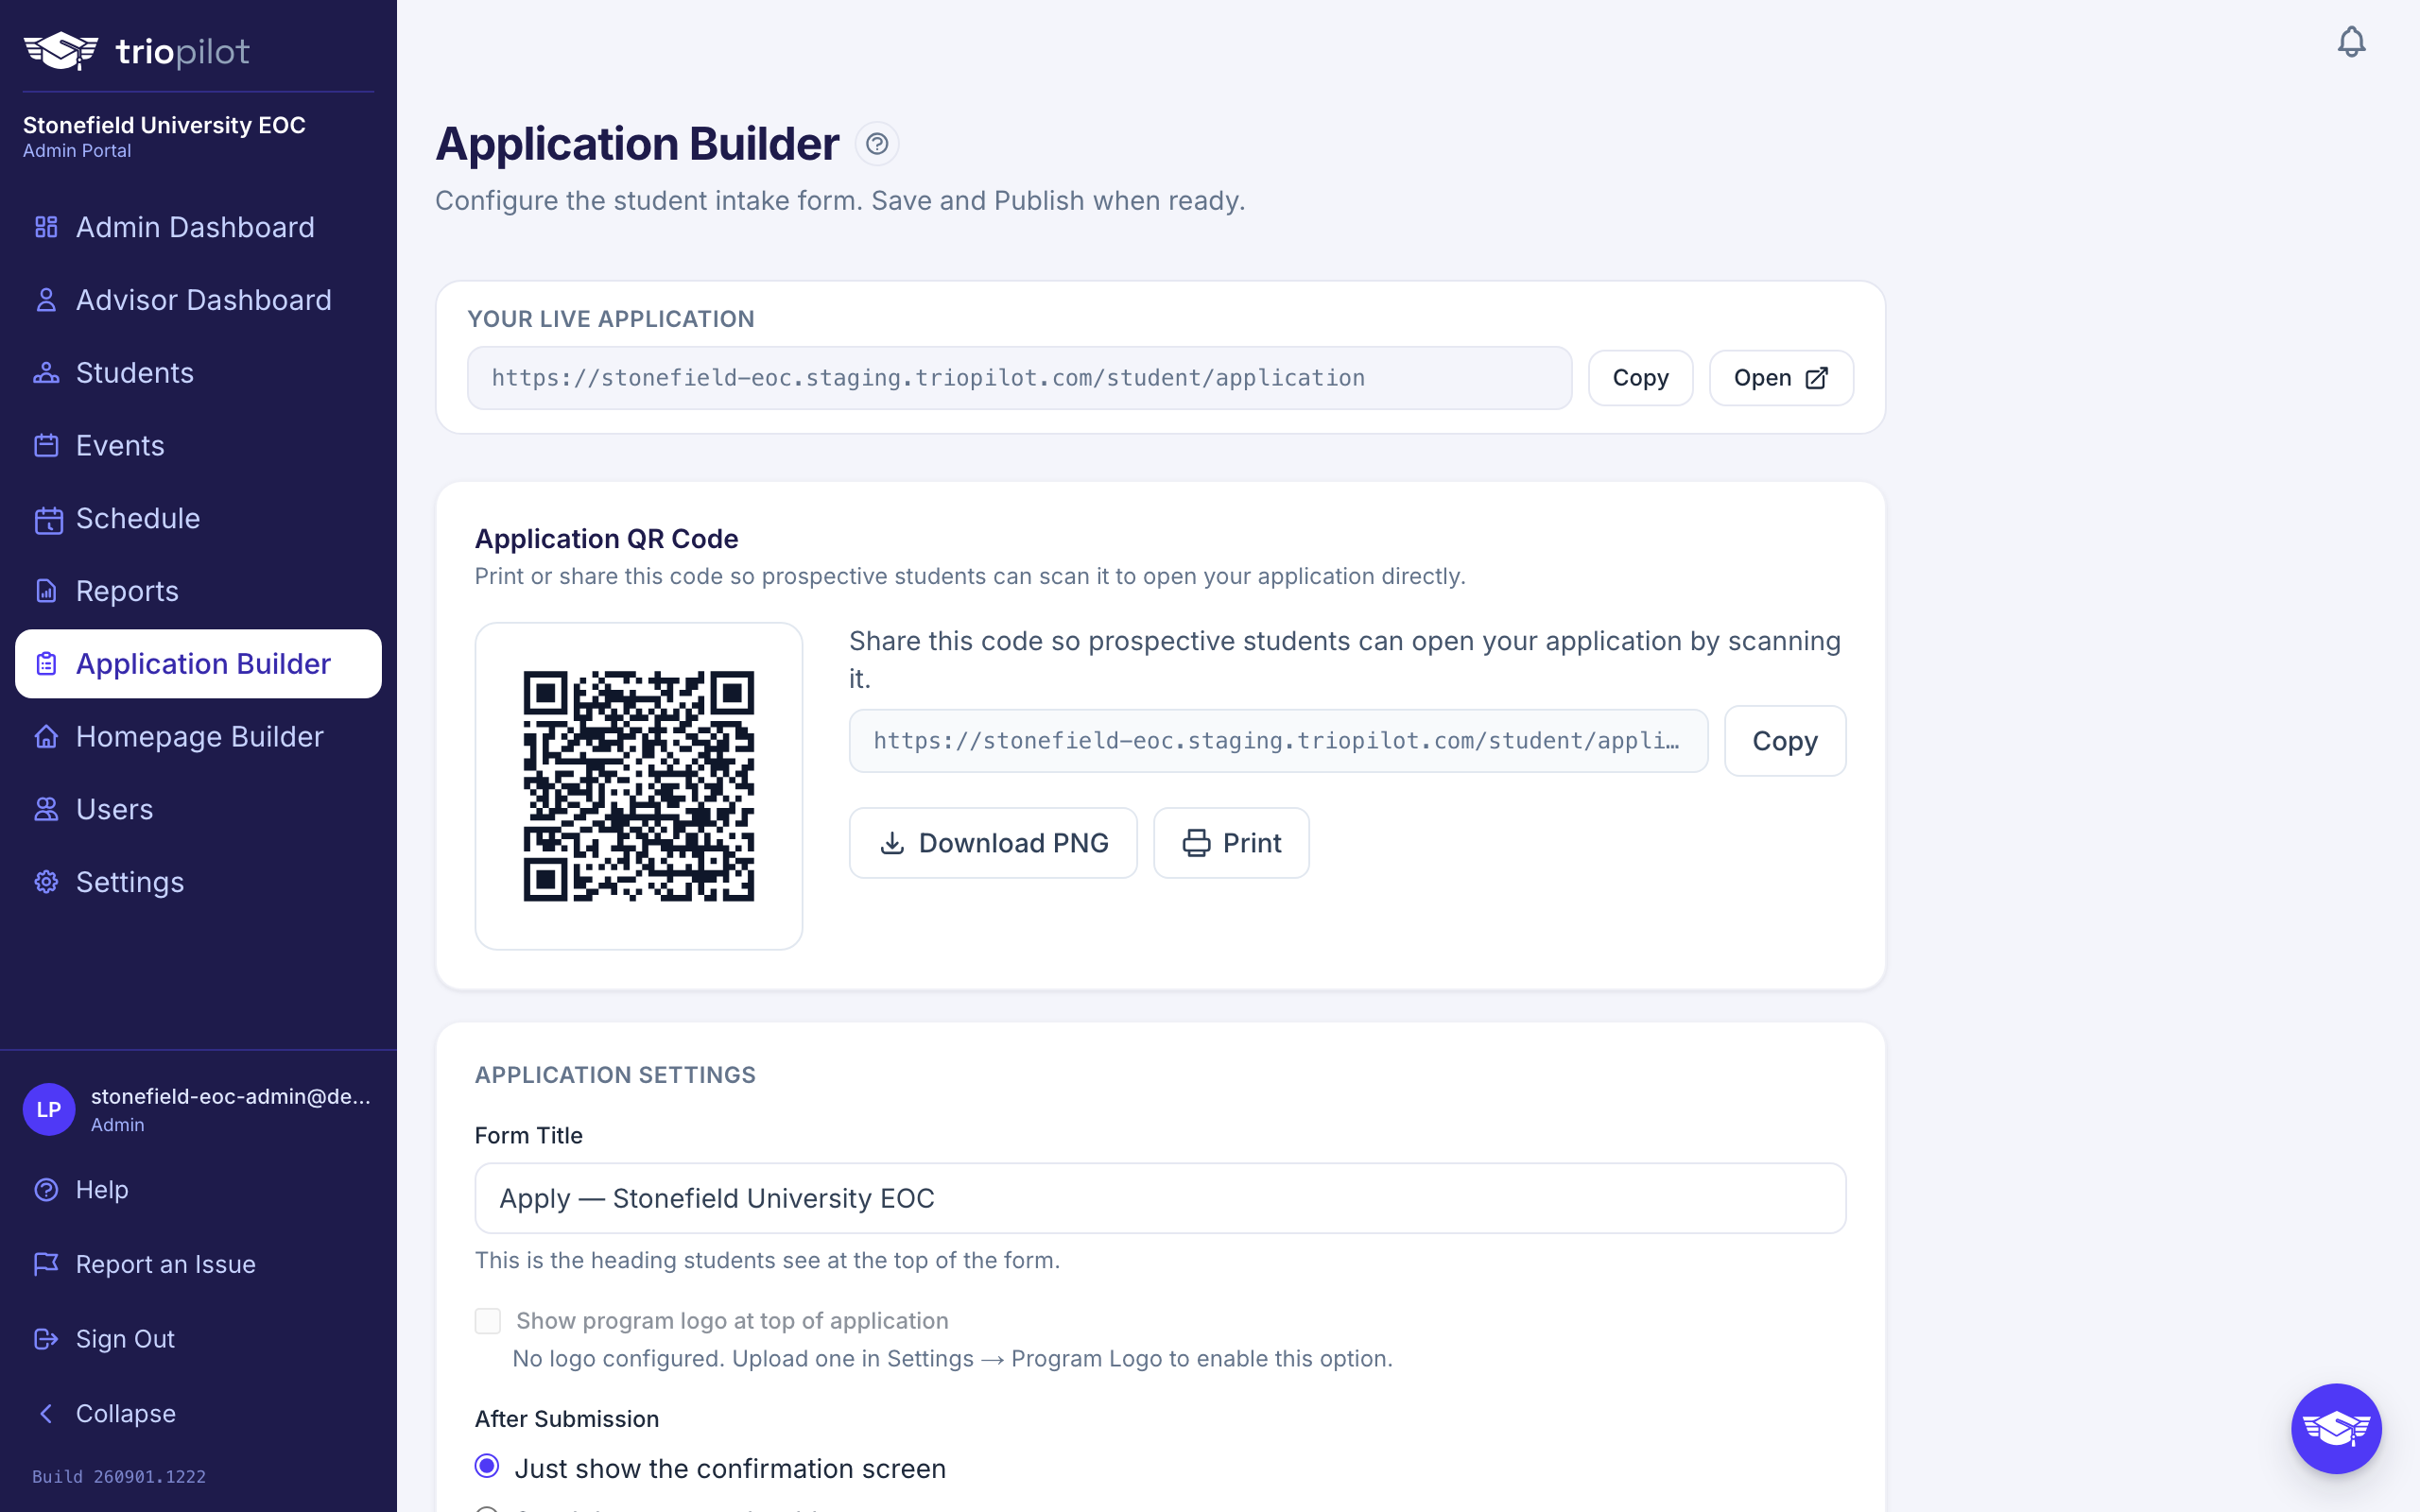
Open the Builder
Go to Application Builder in the admin menu. You'll see your current questions, which you can rearrange, edit, add to, or remove.
At the top of the page, under Your live application, is the public URL applicants use. Copy puts it on your clipboard. Open loads the live form, meaning your last saved version, in a new tab.
Application Settings
The Application Settings card at the top of the builder controls the form itself:
- Form Title: the heading applicants see at the top of the form.
- Show program logo at top of application: this checkbox stays disabled until you upload a logo in Settings, on the Program tab, under Program Logo.
- After Submission: what happens the moment someone submits. Three choices, covered below.
What Happens After Someone Submits
Pick one of the three After Submission options:
- Just show the confirmation screen. The applicant stays put and reads your confirmation message. Nothing else happens.
- Send them to a web address. Choosing this reveals a box for the URL. The confirmation screen appears first, then a ten-second countdown carries them to your page, with a Continue link for anyone who does not want to wait.
- Invite them to book an appointment. The applicant stays on the confirmation screen and, just under your message, sees an invitation to pick a time with your program. This option needs appointment scheduling turned on in Settings, on the Features tab. Until it is on, the option is visible but cannot be chosen, and applicants simply see the confirmation screen.
Below your questions is the Confirmation Screen editor: the message applicants read immediately after they submit. Leave it blank and they see "Application Submitted" plus the wording shown greyed out in the box, which thanks them and says someone will be in touch.
If you invite applicants to book, write your message with that in mind. The booking invitation sits underneath it, so a message that tells people to sit tight and wait for a call fights with the button asking them to choose a time. Say you have their application and let the invitation handle the rest.
All of it saves together when you choose Save and Publish.
Add and Arrange Questions
- Choose Add question below the list, or hover above or between the cards and click the + to insert one in place. The + offers Question or Text block; a text block is explanatory copy rather than something to answer.
- Type the wording in the card header, where it says Question text.
- Set Type. The Standard fields group includes Short Text, Long Text, Dropdown, Multiple Choice (single), Multiple Choice (multi-select), Date, Email, Phone, File Upload and Yes / No. The APR / Special fields group holds the ready-made ones described below.
- For choice questions, type each option and press Add.
- Tick Required where you need an answer. Required is enforced when the form is submitted, not just in the browser.
- Drag a card by the handle on its left to reorder. The live form follows the same order.
Ready-Made Questions
The APR / Special fields group in the Type picker holds questions that configure themselves. Pick one and it sets its own type, points itself at the right profile and reporting field, and fills in the answer options, so you never have to build a dropdown and map it by hand:
- Education Level (APR status): seeds the education-status choices for your program type and stores the federal value your APR needs.
- Income Eligibility Calculator: asks household size, then offers income ranges built from that size's limit in your Low-Income Eligibility Thresholds on the Reporting tab in Settings, and records the low-income result.
- Immigration Status (eligibility): U.S. citizen, Lawful permanent resident (Green Card holder), FAFSA-eligible non-citizen.
- Address (autocomplete): one field that autocompletes and fills Address Line 1, Address Line 2, City, State and ZIP Code.
- Signature: a draw-with-your-mouse canvas. The signature is embedded in the application PDF stored in the student's files.
- SMS Opt-In (text consent): arrives with the consent wording you need before texting a student.
- Also here: Sex (APR), Race (APR, select all that apply), Hispanic / Latino (APR ethnicity), Military Connection (APR), Limited English Proficiency (APR), First-Generation Status (APR eligibility) and Other TRIO Programs (APR).
Several arrive already ticked Required, where eligibility or reporting needs an answer. You can untick that per question.
If you change your mind, changing a ready-made question back to a plain type, or clearing its Maps to field, also clears the answer options it filled in for you. The one exception: if you have added or removed options yourself, the builder leaves your list alone rather than guessing which ones were yours.
To collect a high school, set a question's Maps to field to High School Attended. Applicants then get a dropdown of the schools in your High School List in Settings, plus an "Other (not listed)" choice that opens a text box. Add those schools first, on the Participants tab: with an empty list, the question renders as a plain text field.
Each profile field can be mapped to only one question. If a Type or Maps to pick would duplicate an existing mapping, the builder refuses it and names the question that already holds that field.
Let Applicants Choose an Advisor
You can ask applicants who they would like to work with and have their answer become the student's Assigned Advisor the moment the application is submitted.
- Add a Multiple Choice (single) or Dropdown question, for example "Select an Advisor", and type one option per advisor in whatever words you like: a first name plus the languages they speak, a campus, anything. Add a "No Preference" option if you want to offer one.
- Set the question's Maps to field to Assigned Advisor, in the Student assignment group at the bottom of the list. Only single-choice questions offer it, and only one question per form can carry it.
- An Advisor picker appears under each option. Pick the staff member that option stands for. The list holds only staff who can currently carry a caseload (advisors and admins who are not archived). Leave an option on No preference (let the program assign) for choices like "No Preference".
- Save.
Applicants see only your option text; the link to a staff member is invisible to them, and their answer is stored on the application exactly as they chose it. When the application comes in, the linked staff member becomes the student's Assigned Advisor and is notified the same way as any other assignment. An option left on No preference, or an option whose staff member has since been archived, leaves the student unassigned so your program can assign someone later. If a linked staff member is no longer assignable, the option shows a warning in the builder until you pick someone else.
Staff entering a paper application through Add New Student get the same question. There, the advisor chosen in the staff panel at the top of the form wins; the applicant's preference is used only when that panel is left empty.
Show Questions Only When They Apply
Every question card has a Show only when… checkbox. Tick it to add a condition, so a follow-up appears only when someone gives a particular answer. With more than one condition you choose whether All or Any must match.
The trigger has to be a Yes/No, dropdown, or multiple-choice question, and it can sit anywhere in the form, before or after the question it controls. Until your form contains one, the checkbox stays disabled.
Translations Are Automatic
Each time you save, TRIOPilot regenerates Spanish and Haitian Creole versions of your question text, help text, answer options, and confirmation message. There is nothing to configure. Applicants switch with the English, Español, Kreyòl toggle at the top of the form. To check the wording yourself, open Preview and use the toggle there.
The form title is one exception: it is shown as you typed it in every language.
Preview Before You Publish
Preview opens a new tab with the same form applicants get, conditional logic active, including edits you have not saved yet. Three things behave differently: answers are not saved, file uploads are disabled, and the booking invitation never appears, since preview submits nothing and so has no application to book against. All three work on the live form.
Preview publishes nothing. When it looks right, return to the builder and choose Save and Publish. The live form picks up your changes right away.
Share Your Form
- Copy the live URL from the top of the builder and share it anywhere: your website, emails, texts.
- Handing out flyers or tabling at an event? The Application QR Code card sits right under that URL, on this same page, and offers Download PNG and Print for a sheet students can scan.
Every application form is protected from bots automatically, so there is nothing to set up.
Filling the Form for a Student
Staff keying in a paper application have a better path than the public form: Add New Student on the Students page opens this same form with staff-only extras, such as assigning an advisor and choosing the program year, and an email address is optional there. See Add a student by hand.
The public form still works for helping someone apply in the moment: it has no sign-in, so a student can fill it out with you beside them, over the phone, at an outreach event, or in the office. Submitting creates no account for anyone.
One thing matters on the public form: enter the student's own email address, never your own. It is how your program reaches them afterwards, and a matching email is one of the signals that flags a possible duplicate for staff review. Put your own address on ten applications and all ten will flag each other.
Tips
- Keep it short. Every extra question is one more reason an applicant abandons the form.
- Tick Required on the fields you genuinely need and leave the rest optional.
- Deleting a question does not erase anything a past applicant submitted. Their answers stay on their student record and in their application history. It does stop collecting that data from here on, which is why the builder names the linked field before you confirm.
- The special questions read their choices from Settings. See Find your way around Program Settings for the income thresholds, high school list, and logo they depend on.